Participants
Click Participants in the left sidebar to open the Electoral Register — the complete list of everyone who is eligible to vote in this event. The Electoral Register is the foundation of your election's integrity: only people on this list can receive voting credentials, and the accuracy of the list directly affects the legitimacy of the result. An incomplete register means eligible voters are locked out. An incorrect register means ineligible people might vote. Getting this right before the election opens is essential.
The Participants section is where you manage the entire voter lifecycle: adding participants before the election, maintaining their records during setup, and managing edge cases like credential reissues, check-ins, and access blocks once voting is underway.
Member list field configuration and weighted voting format cannot be changed once participants have been imported. Configure Settings first.
This warning is important. Before you add a single participant, go to Settings and confirm your field configuration and voting format. If you decide later that you need to add a field you didn't enable, or enable weighted voting, you would need to clear all participants and start again. A few minutes spent in Settings upfront can save significant rework.
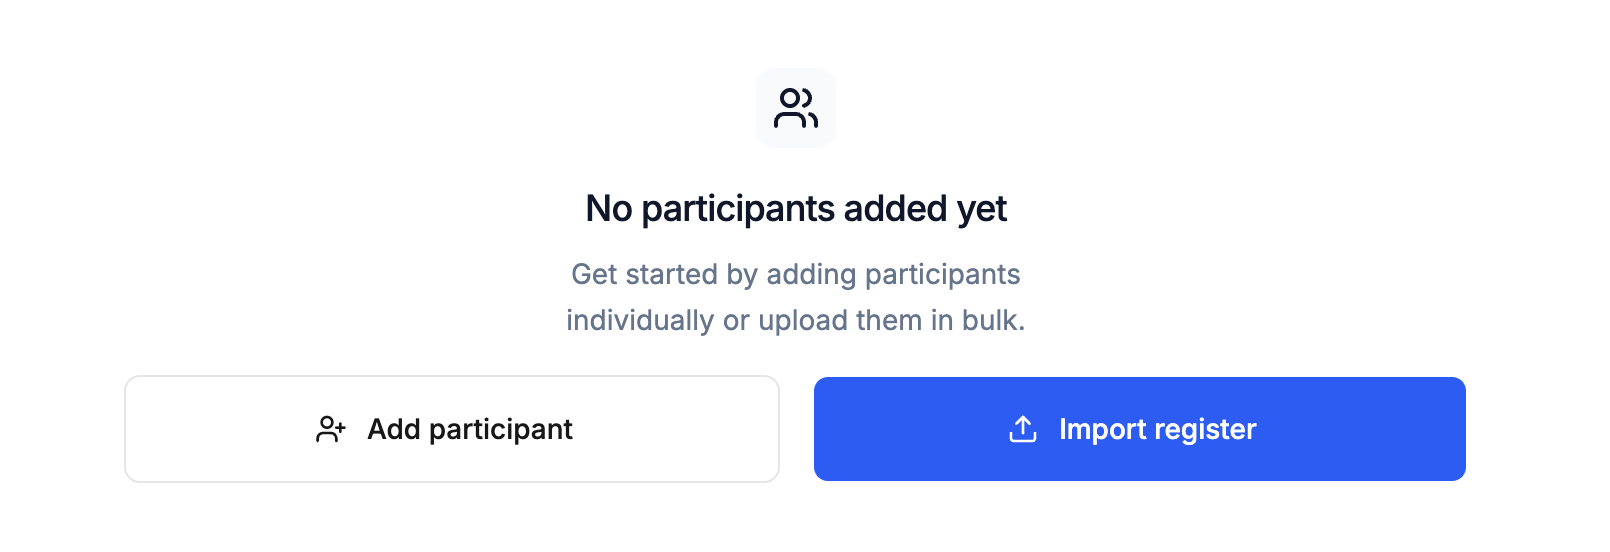
Adding participants individually
For small events or when you need to add a handful of people, you can add participants one at a time. Click Add participant. Before the entry form appears, Electobox will ask you to configure which fields are available on participant records. This configuration step only happens once — after you set it, the same fields apply to every participant in the register.
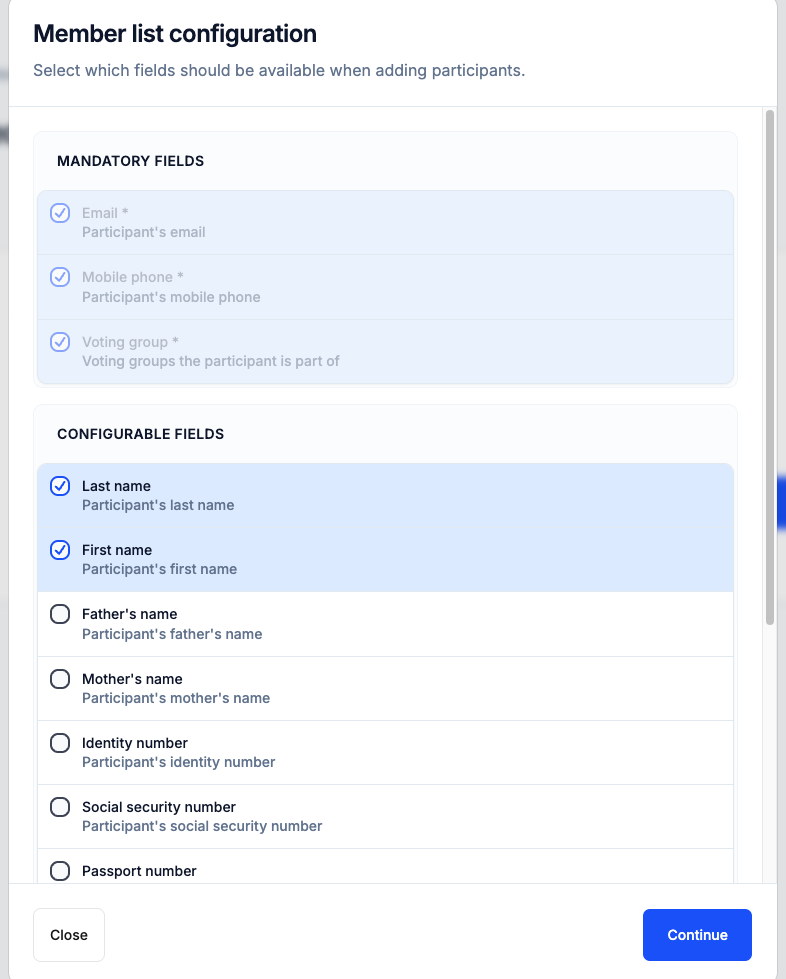
Mandatory fields
Some fields are always required, regardless of your event type. Every participant must have:
- Email address — Used to send the voting credential and any communications during the election
- Mobile phone — Used as an authentication channel and for SMS-based communications where configured
- Voting group — Determines which ballots the participant is eligible to vote on
Configurable fields
Beyond the mandatory fields, there are a range of optional fields you can enable depending on what your event needs. These include first name, last name, various ID number formats, and organizational fields. Toggle on whichever fields are relevant to your setup.
Think carefully about which fields you actually need. Every field you enable will appear on every participant record and in the import template. Enabling fields you won't use creates unnecessary complexity and increases the chance of errors in your data. On the other hand, fields you might need — such as an ID number for identity verification at a polling station — should be enabled before you begin, not added partway through.
Filling in the participant form
Once field configuration is done, the participant form appears with all your selected fields. Fill in the required information:
| Field | Notes |
|---|---|
| Required — double-check for typos, as this is where voting credentials are sent | |
| Mobile phone | Required — include the country code if participants are in multiple countries |
| Voting group | Required — select the group this participant belongs to |
Additional optional fields appear below based on your field configuration. Fill in whatever is relevant.
Before submitting, you must check the confirmation box to confirm that the participant's details are accurate and that you have obtained the necessary consent for processing their personal data. This is a legal compliance step, not just a formality — make sure it applies to your situation before proceeding. Then click Add Participant to complete the entry.
Importing participants in bulk
For most events with more than a handful of participants, importing from a file is far more practical than adding people one by one. The bulk import is designed to handle everything from a few dozen to thousands of participants in a single operation.
Click Import register to begin. The import process follows four structured steps that guide you from file preparation to final confirmation.
Step 1: Settings
Before you upload anything, configure which fields are expected in your import file. This works the same way as the individual add flow — mandatory fields are always included, and you toggle on any optional fields you need. The field selection you make here determines what columns will appear in the downloadable template and what Electobox will look for in your file.
If you have already configured fields by adding an individual participant, those settings will be reflected here. Make any adjustments if needed.
Step 2: Upload file
Once your field configuration is set, download the provided Excel template. This template is pre-configured with exactly the right columns in the right format based on your field selection. Using the template is strongly recommended — it eliminates the risk of column mismatches and makes the mapping step much smoother.
Fill in the template with your participant data, then upload the completed file. Accepted formats are .csv and .xlsx, with a maximum file size of 10MB. If your participant list is extremely large and exceeds this limit, consider splitting it into multiple imports or contact support for guidance.
Step 3: Mapping
Once your file is uploaded, Electobox will attempt to automatically match your file's columns to the corresponding fields in the system. If you used the downloaded template, this step will usually be seamless. If you used your own file or adapted the template, some columns may need to be mapped manually — drag or select the correct Electobox field for any columns that weren't matched automatically.
Take a moment to verify all the mappings even if the auto-match looks correct. A mismatched column — email data ending up in the phone number field, for example — would create problems for every participant in the file.
Step 4: Validation
Before the import is finalized, Electobox runs a validation check on your data and displays any errors or warnings it finds. Common issues include missing required fields, duplicate email addresses, invalid phone number formats, and unrecognized voting group names.
Review every error in the validation report. Errors must be fixed before the import can proceed — rows with errors will not be imported. Warnings may or may not need to be addressed depending on the issue. For most error types, the easiest fix is to correct the data in your spreadsheet and re-upload the file.
Once you are satisfied that the data is correct, check the confirmation box to confirm accuracy and data processing consent, then click Import to complete. Only one bulk import can run at a time, so if you are working with a large file, wait for it to finish before starting another.
Managing participants
Once participants are in the register, you can search for any individual using the search bar. The search is accent-insensitive and matches against any field, so you can find people by name, email, phone number, or any other registered detail.
When you find the participant you are looking for, click ⋮ next to their name to see the available actions. What you can do depends on whether the election is currently running.
When the election is not running
Before the election starts, you have full editing access to all participant records.
| Action | What it does |
|---|---|
| View | Open the participant's full record in read-only mode |
| Edit | Update any field: name, ID numbers, vote weight, voting group assignment |
| Delete | Remove the participant from the register entirely |
Use this period to make sure your register is clean and accurate. Verify that all email addresses are correct (they are the primary channel for voting credentials), that phone numbers include country codes, and that voting group assignments match your actual membership records.
When the election is active
Once voting opens, direct editing of participant records is restricted to prevent changes that could compromise the integrity of the vote. However, a targeted set of actions remain available for handling legitimate real-world situations that come up during voting.
| Action | What it does |
|---|---|
| View | View participant details in read-only mode |
| Edit contact info | Correct an email address or phone number — for example, if a participant reports they aren't receiving their credential |
| Resend credentials | Generate a new sign-in link for the participant; this automatically deactivates the previous link |
| Check-in at polling station | Record the participant as voting in person at the polling station; this deactivates their online voting link to prevent double-voting |
| Block participant | Deactivate the participant's voting access entirely — for example, if a credential is believed to be compromised |
The Resend credentials action is the most commonly used during a live election. If a participant says they haven't received their email, can't find it, or their link has expired, use this action to send them a fresh one. The old link is immediately invalidated, so there is no risk of both links being used.
The Check-in at polling station action is critical for hybrid events. When a participant arrives in person to vote on a voting machine or paper ballot, checking them in here prevents them from also casting an online vote, ensuring each person votes only once regardless of channel.
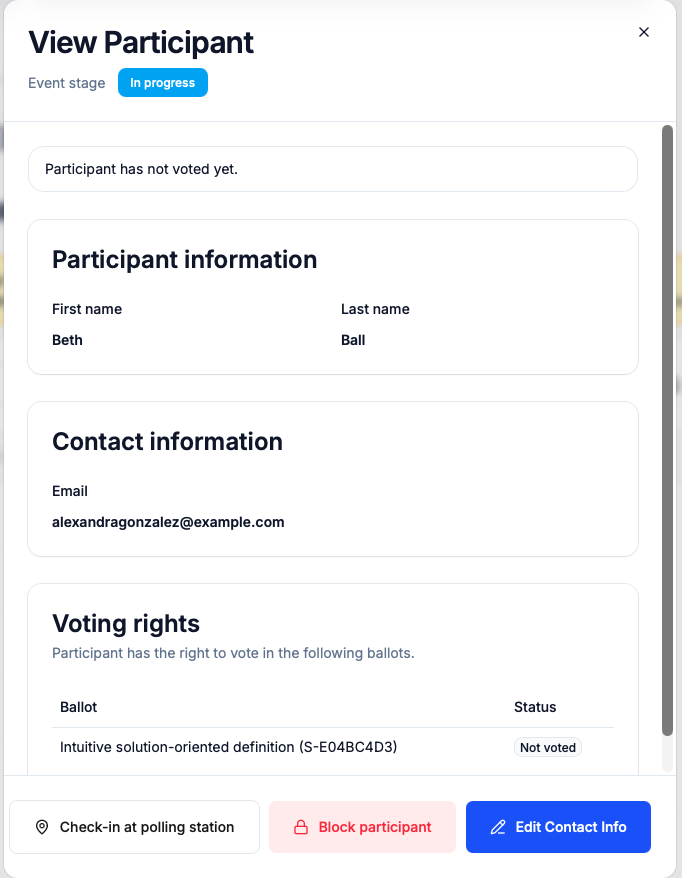
Viewing a participant record
Clicking View on any participant opens their full record as a panel. The record is organized into three sections: Participant information (their name and any other profile fields you have configured), Contact information (email address and phone number), and Voting rights (the list of ballots they are eligible to vote on, along with their current voting status on each one).
At the top of the panel, a status indicator shows the current event stage. If the participant has not yet voted, a notice confirms this. Once they have voted, the voting status on each ballot updates accordingly.
The action buttons at the bottom of the panel give you direct access to the most common live election actions without needing to close the record first: Check-in at polling station, Block participant, and Edit Contact Info are all available here.
In hybrid events
For hybrid elections, the participant view and available actions change to reflect the dual channel nature of voting. The Voting rights section shows each ballot alongside the participant's status per channel, making it immediately clear whether someone has voted online, been checked in at the polling station, or not yet voted through either channel.
The Check-in at polling station action takes on particular importance in this context. When a participant arrives in person, you must check them in through this action before they vote. This does two things simultaneously: it records them as participating via the in person channel, and it permanently deactivates their online voting link so they cannot also cast a digital vote. If a participant has already used their online link before arriving in person, the check-in option will reflect this and the system will not allow a second ballot to be submitted.
Export
The export function produces a timestamped Excel file containing all participants in the register along with their current voting status — whether they have voted, how they voted (online or in person), and any other relevant status information.
Click Export at any time to generate this file. During an active election, exporting periodically creates a running audit trail that shows participation as it builds. This can also be useful if you need to follow up with participants who haven't voted yet, or to provide a real-time participation snapshot to event organizers or observers.
After the election closes, the export provides a complete record of who voted that can be retained alongside the official results for compliance and audit purposes.