Settings
The Settings section is accessible from the left sidebar. It contains four pages that together define the fundamental structure of your event: what it's called and how it's described, how voting will take place, how voters will authenticate themselves, and any special rules around how votes are counted.
Settings should be the first thing you configure when setting up a new event. Some of these options particularly the participation format and weighted voting have downstream effects on other parts of the setup, and some cannot be changed once you have started adding participants or configuring other sections. Getting Settings right before you proceed will save you from having to backtrack later.
Work through all four Settings pages before importing participants or configuring ballots.
Event info
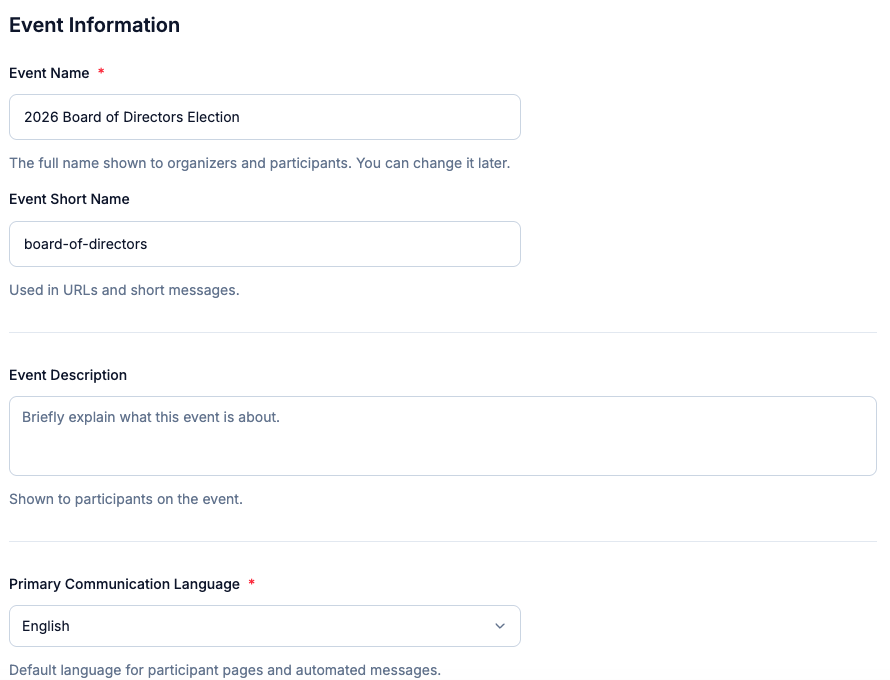
The Event info page contains the basic descriptive information about your event. Most of these fields can be edited at any time, including while the election is running.
| Field | Notes |
|---|---|
| Event name | Full name shown to organizers and participants. Editable at any time. |
| Short name | Used in URLs and short messages. No spaces. |
| Description | Shown to participants on their voting page. |
| Primary communication language | Language for all participant-facing pages and automated messages. |
| Support email / phone | Shown to participants on the event page and in outgoing messages. |
The event name is the most visible field it appears at the top of every ballot and in all communications sent to participants, so make it clear and specific. Avoid abbreviations that might confuse participants who are less familiar with the event.
The description appears on the voter-facing event page, visible to participants before they access their ballot. Use it to give context: what the event is, what they will be voting on, and any important instructions or deadlines. A well-written description reduces support queries and helps participants feel informed and confident before they vote.
The support email and phone number are shown prominently to participants throughout the voting experience. Make sure these reach someone who can actually respond promptly during the voting period. If a participant can't log in or is having trouble, this is the contact they will use.
Voting format
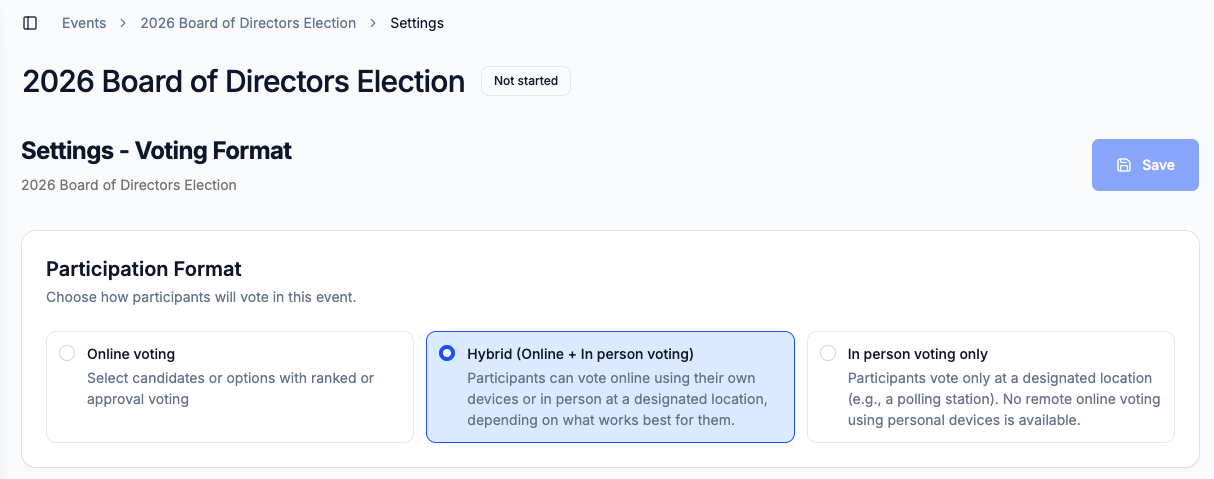
The Voting format page is where you define the fundamental mechanics of how your event will run: whether voting is online only or hybrid, and if hybrid, how in-person voting will work.
Participation format
| Option | Description |
|---|---|
| Online voting | Voters receive a sign-in link and vote from their own device |
| Hybrid (Online + In-person) | Both channels run simultaneously; each voter has independent eligibility per channel |
Online voting is the simpler of the two formats. Every participant receives a unique sign-in link by email or SMS, and they vote from whatever device they have available computer, tablet, or phone. The entire election is conducted digitally, and results are produced through the trustee decryption process after voting closes.
Hybrid events run both online voting and in-person voting at the same time. Participants can vote through either channel depending on their eligibility and preference. Each voter has independent eligibility per channel, meaning a participant can be authorized to vote online, in person, or both, depending on how you configure it. The final results combine the encrypted online ballots with the in-person totals to produce a single unified outcome.
Hybrid elections are more complex to administer but are essential for events where some participants need or prefer to vote physically large organizational meetings, shareholder assemblies, or events where remote participation isn't appropriate for all members.
Changing the participation format after you have started configuring other sections will reset the configuration for the removed channel. For example, switching from Hybrid to Online-only will clear all your in-person voting settings. Set your format before moving on to other configuration.
In-person voting method
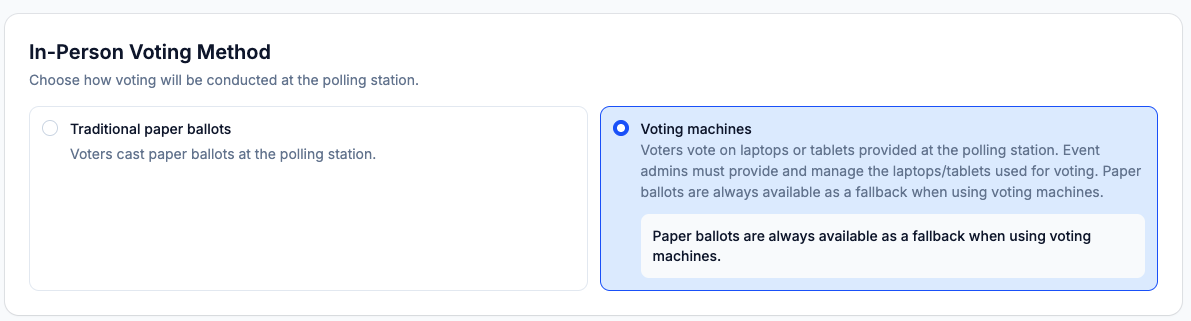
This section only applies to Hybrid events. It determines how participants who show up in person will cast their ballots.
Traditional paper ballots Voters at the polling station cast paper ballots in the conventional way. The paper ballots are counted separately after the election closes, and the results are entered manually into Electobox to be combined with the online results. This method is familiar, requires no special equipment at the polling station, and produces a physical paper audit trail. The trade-off is that in-person results require manual data entry after the election, which introduces a step that needs to be done carefully and accurately.
Voting machines Instead of paper ballots, voters at the polling station use laptops or tablets provided by the election administrators to cast their votes digitally through the Electobox voter interface. This method integrates in-person voting directly into the system, eliminating the manual upload step. The admin is responsible for providing, setting up, and managing the devices at the polling station. Paper ballots are always available as a fallback in case of technical issues with the devices.
Voting machines are generally more efficient for larger in-person events where data entry errors in paper uploads would be a concern. Traditional paper ballots may be preferred where paper audit trails are required by your organization's rules, or where polling station administrators are not comfortable managing devices.
Voting machine authentication
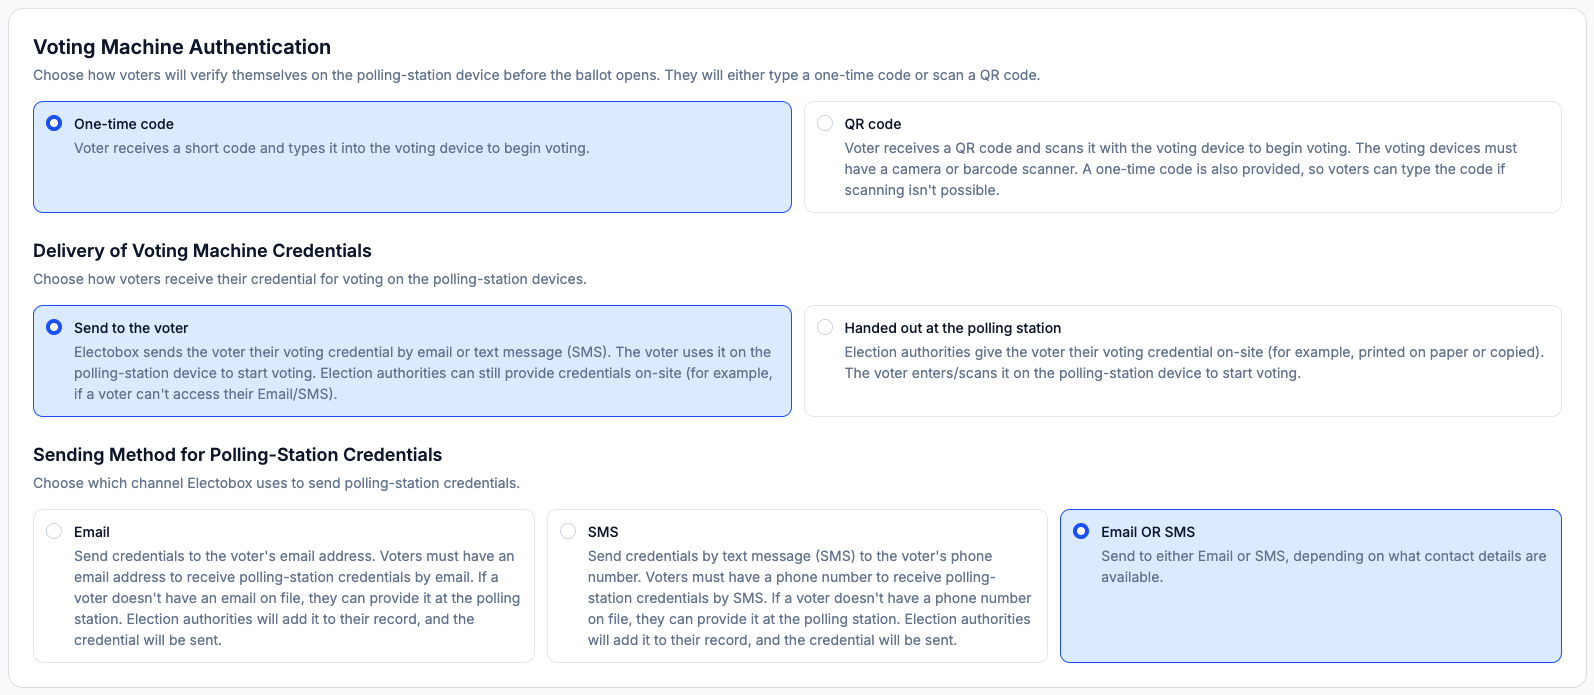
This section applies when you have selected Voting machines as your in-person method. It determines how voters prove their identity on the polling station device before their ballot opens.
| Option | Behavior |
|---|---|
| One-time code | Voter receives a short code and types it into the voting device |
| QR code | Voter scans a QR code with the voting device. A one-time code is also provided as fallback. Voting devices must have a camera or barcode scanner. |
The one-time code method is simpler and works with any device. The voter receives a short numeric code by email, SMS, or printed handout and types it into the voting machine to authenticate. This is a good default for most polling station setups.
The QR code method is faster for voters and reduces the chance of code entry errors. The voter opens the QR code on their phone or printed credential and holds it up to the voting machine's camera. The device scans it and the ballot opens automatically. A one-time code is always generated as a fallback for voters who can't display a QR code. For this method to work, the voting machine devices must have a functioning camera or barcode scanner.
Delivery of voting machine credentials
This setting determines how participants receive the code or QR they'll use to authenticate at the polling station.
| Option | Behavior |
|---|---|
| Send to the voter | Electobox sends the credential by email or SMS before the event |
| Handed out at the polling station | Election authorities distribute credentials on-site at the time of voting |
Send to the voter means each participant receives their polling station credential in advance, through the same contact details used for the rest of the election. This is convenient for participants but requires that contact information is accurate. If a participant shows up without their credential, polling station staff can look it up and provide it on the spot.
Handed out at the polling station means the admin team prepares and distributes credentials on-site for example, printed slips or a screen showing each voter their code when they check in. This approach gives the admin full control over credential delivery and doesn't rely on participants having checked their email or SMS before arriving.
When Send to the voter is selected, you also choose the delivery channel:
| Option | Behavior |
|---|---|
| Credential sent to the voter's email address. If none is on file, polling station staff can add it at check-in. | |
| SMS | Credential sent to the voter's phone number. If none is on file, polling station staff can add it at check-in. |
| Email OR SMS | Sent to whichever contact detail is on file; defaults to email where both exist. |
Polling-station extra verification
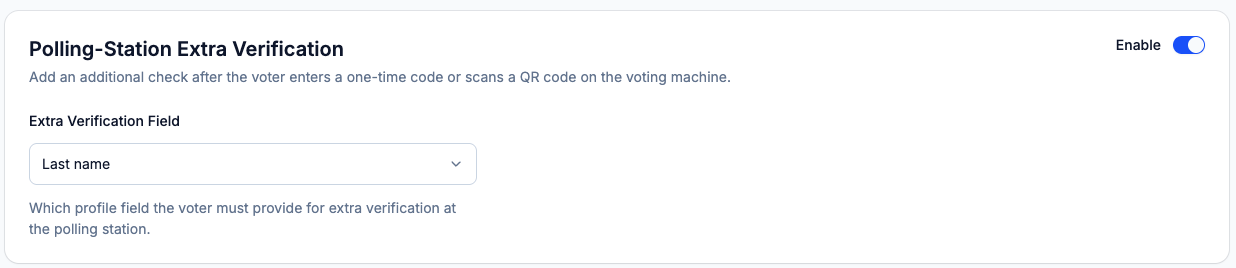
This is an optional additional identity check that happens after a voter enters their code or scans their QR at the polling station. When enabled, the voter must also provide a specific piece of profile information typically their last name before the ballot opens. This acts as a basic "something you know" check to confirm that the person presenting a credential is actually the person it was issued to.
This setting is particularly valuable when credentials are sent in advance, since it means a credential that falls into the wrong hands can't be used without also knowing the voter's registered details.
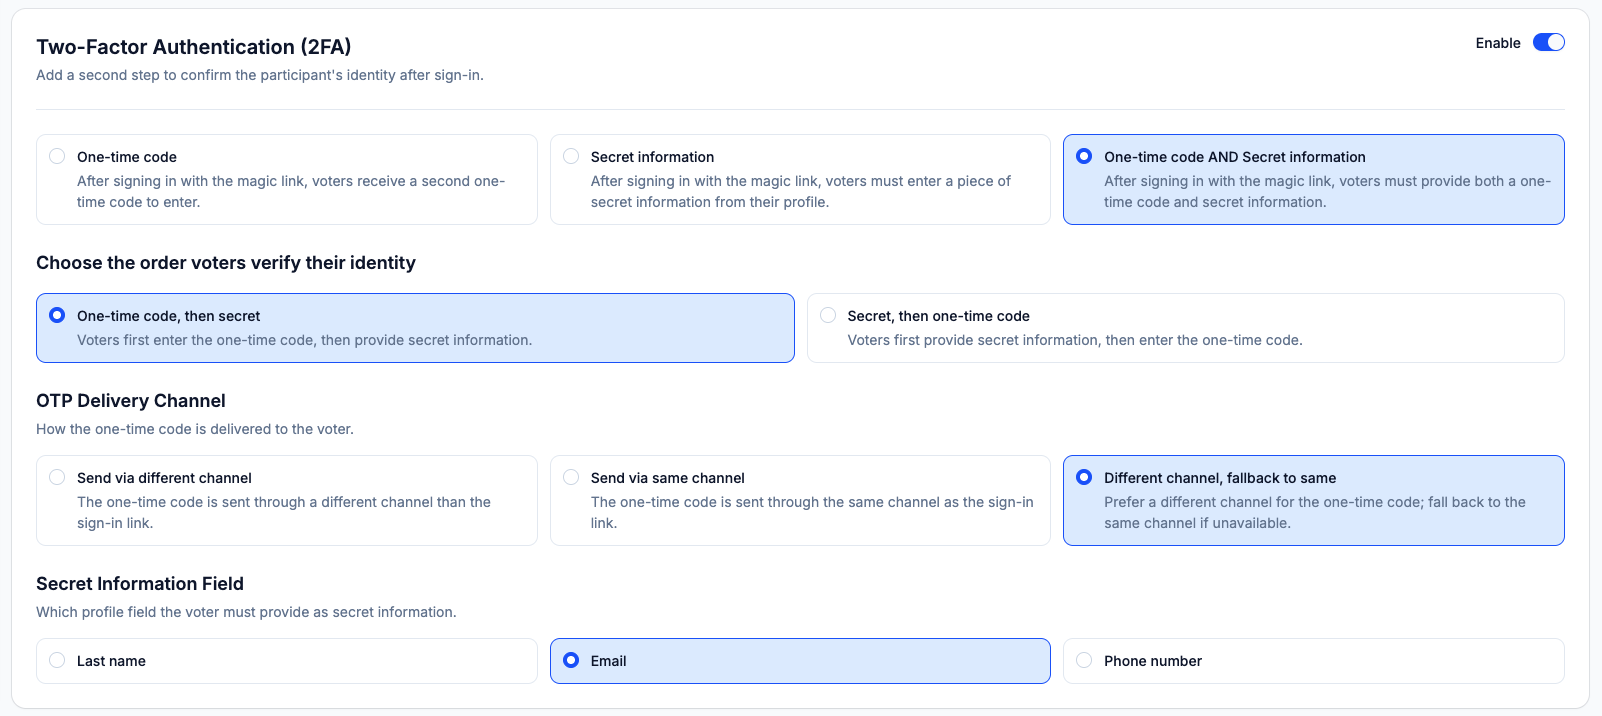
Two-factor authentication (2FA)
Two-factor authentication adds a second verification step for online voters, triggered after they click their sign-in link and before their ballot appears. It's an important security layer that significantly reduces the risk of unauthorized voting if a sign-in link is forwarded or intercepted.
2FA is disabled by default. Toggle Enable to turn it on.
Choose which second factor to require:
| Option | Behavior |
|---|---|
| One-time code | After signing in with the magic link, voters receive a second one-time code to enter before seeing the ballot |
| Secret information | After signing in, voters must enter a piece of secret information from their registered profile |
| One-time code AND Secret information | Voters must provide both factors a one-time code and a piece of secret information |
One-time code 2FA is the most common approach. After clicking their sign-in link, the voter is prompted to enter a short code that is sent to them in real time via a separate channel (or the same channel, depending on your OTP delivery setting below). This confirms that the person logging in also controls the contact details on record.
Secret information 2FA asks the voter to provide a piece of data from their profile such as their last name, email, or phone number. This works without sending any additional message and can be useful in environments where SMS or email delivery is unreliable, or as a quieter second factor that doesn't require voters to wait for a message to arrive.
One-time code AND Secret information is the strongest option, requiring both factors. Use this for elections where security is a high priority and voters are expected to be comfortable with a slightly more involved login process.
Order of verification
When both factors are required, you choose the order in which voters are prompted:
- One-time code, then secret - Voters first enter the one-time code (which they may need to wait briefly to receive), then provide the secret information
- Secret, then one-time code — Voters first provide their secret information, then receive and enter the one-time code
The "secret first" order can feel smoother for voters because they can complete the first step immediately without waiting for a message to arrive.
OTP delivery channel
This setting applies when a one-time code factor is configured. It determines whether the 2FA code is delivered through the same channel as the original sign-in link or through a different one.
| Option | Behavior |
|---|---|
| Send via different channel | The one-time code is delivered through a channel different from the sign-in link (e.g., link by email, code by SMS) |
| Send via same channel | The one-time code is delivered through the same channel as the sign-in link |
| Different channel, fallback to same | Prefers a different channel; falls back to the same channel if the voter has only one contact method on file |
Sending via a different channel provides stronger security, since an attacker who intercepts the sign-in link in one channel (e.g., email) would also need access to the voter's other channel (e.g., their phone for SMS) to complete the login. This is the recommended setting when strong security is a priority and your participants have both email and phone on file.
Sending via the same channel is simpler but provides less separation between the two factors. It can be a reasonable choice for lower-stakes elections or when many participants only have one contact method registered.
Secret information field
When a secret information factor is configured, this setting determines which profile field the voter must enter to verify their identity. The available options are:
- Last name
- Phone number
Last name is typically the most practical choice - it's something every voter knows and doesn't require them to type out a full email address or phone number. If your participants have complex or easily misspelled last names, email may be a more reliable option.
Voting settings
The Voting settings page covers a special rule that change how votes are counted: weighted voting. B
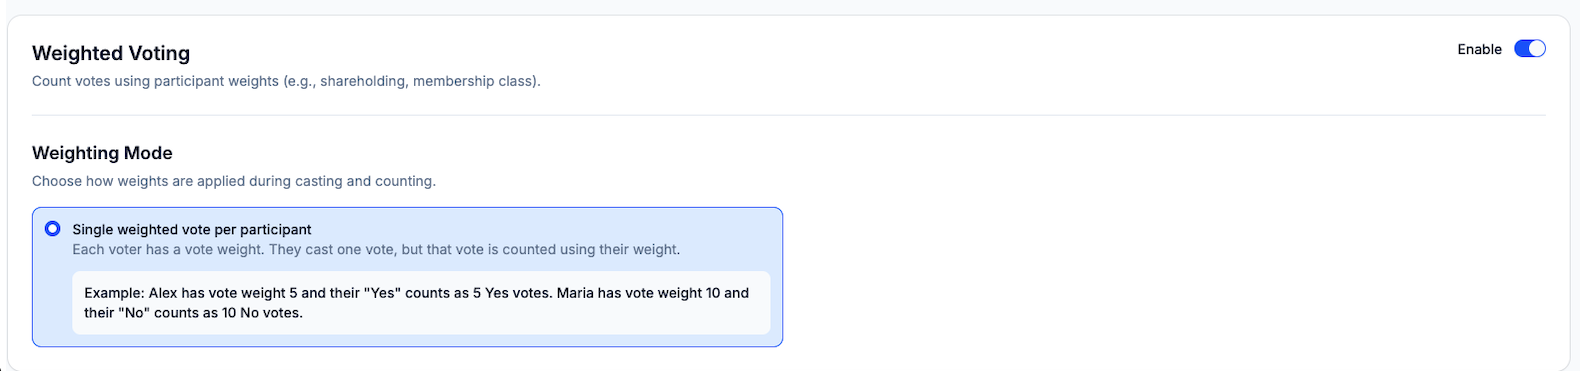
Weighted voting
Weighted voting changes the way vote counts are calculated. Instead of each participant's vote counting equally as one vote, each participant is assigned a weight, and their vote counts as that weight value. This is most commonly used in shareholder meetings where voting power is proportional to shareholding, or in organizational structures where different membership classes carry different voting rights.
When weighted voting is enabled, each participant's weight is set in the Participants section on their individual record. The default weight for a participant with no weight assigned is 1.
Single weighted vote per participant - Each voter casts one vote, and that vote is counted at their assigned weight value. The total votes for a candidate are the sum of the weights of all participants who voted for them, not simply a count of how many participants selected them.
Example: Alex has a weight of 5 and votes "Yes" this counts as 5 Yes votes. Maria has a weight of 10 and votes "No" this counts as 10 No votes. If these are the only two voters, the final tally is 5 Yes and 10 No, despite both being a single person.
Weighted voting interacts with quorum and threshold calculations in your results, so make sure your election rules account for it. If your bylaws specify a majority based on the number of members rather than the weight of votes cast, the two calculations may diverge.
Weighted voting cannot be changed once participants have been imported. This setting determines the data structure of participant records. If you import participants and then try to enable or reconfigure weighted voting, you would need to remove all participants and start the import again. Configure this before adding any participants.